
so here we go firstly you will need

you can make it any size you like .. mine is 11cms across by 12cms down
next we make the loop
cut a strip 3.5cms wide by 14cms long
fold in each end like so
 next fold the strip in half
 then fold this in again
 now iron and stitch so it looks like this

put this to one side for later ..

when you have drawn your pattern you need to pin it to your felt
you need to cut 2 of these for the pouch outer
then cut 2 out of your lining fabric !!

Next give them a quick iron
(only one in the photo i didn't think you would need to see all four pieces after they had been ironed )
If you want to add some applique or embroidery or whatever to decorate your pouch
this is the time

i have appliqued a little bird that Kitty drew a while ago
(yes i do keep everything)
and i have free machined Kitty's name
i will do a simple applique tutorial next week if you like ?
You can of course decorate your pouch anyway you like !!!!
Now you can start to make up the pouch

put one piece of fabric and one piece of felt right sides together like so and pin

this makes one side now do the same with the other piece of fabric and felt
pin
stitch these together like so

now open out and iron out the seams

next you need to put both sides together with right sides on the inside

match up the seams like so
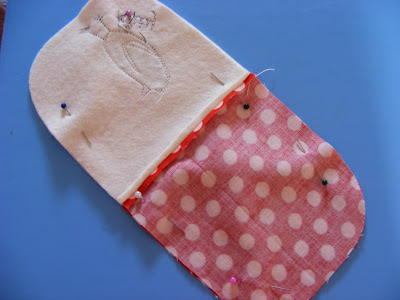
match up all the way around and pin

then when you are happy sew this up leaving a gap for turning
this should be on the lining piece
i sew from here all the way around to here
now the fun bit turn your pouch through
do this slowly and carefully
pushing out the sides as your go along

there you go a pouch
now iron the more time you spend ironing at the stage the nicer the finish
now stitch up the turning gap and snip the threads

turn the lining into the pouch and iron again
you can top stitch if you want
just take your time an go really slowly
just sew a little way in from the top all the way around

now you add the loop we made at the start
now measure up on your pouch where you want the loop to go
and stitch on like so

add a button to the front and away you go
now i know this seems to go on a bit but i wanted it to be clear so if you have not done any or only a little sewing before you can do this ... honest x
If you like this tutorial please leave me a comment and let me know and let others now too .. pass it on by all means !!
if you get stuck and need help please just ask me !
I would love to see photo's as well
If you would rather skip the making section you can go to my website
to find some i have made already !!
- some felt
- pretty lining fabric for the inside of your pouch
- a strip of fabric to make the loop
- a couple of buttons
- thread
- tracing / pattern paper
- tape measure or ruler

you can make it any size you like .. mine is 11cms across by 12cms down
next we make the loop
cut a strip 3.5cms wide by 14cms long
fold in each end like so
 next fold the strip in half
 then fold this in again
 now iron and stitch so it looks like this
put this to one side for later ..

when you have drawn your pattern you need to pin it to your felt
you need to cut 2 of these for the pouch outer
then cut 2 out of your lining fabric !!

Next give them a quick iron
(only one in the photo i didn't think you would need to see all four pieces after they had been ironed )
If you want to add some applique or embroidery or whatever to decorate your pouch
this is the time

i have appliqued a little bird that Kitty drew a while ago
(yes i do keep everything)
and i have free machined Kitty's name
i will do a simple applique tutorial next week if you like ?
You can of course decorate your pouch anyway you like !!!!
Now you can start to make up the pouch

put one piece of fabric and one piece of felt right sides together like so and pin

this makes one side now do the same with the other piece of fabric and felt
pin
stitch these together like so

now open out and iron out the seams

next you need to put both sides together with right sides on the inside

match up the seams like so

match up all the way around and pin

then when you are happy sew this up leaving a gap for turning
this should be on the lining piece
i sew from here all the way around to here
now the fun bit turn your pouch through
do this slowly and carefully
pushing out the sides as your go along

there you go a pouch
now iron the more time you spend ironing at the stage the nicer the finish
now stitch up the turning gap and snip the threads

turn the lining into the pouch and iron again
you can top stitch if you want
just take your time an go really slowly
just sew a little way in from the top all the way around

now you add the loop we made at the start
now measure up on your pouch where you want the loop to go
and stitch on like so

add a button to the front and away you go
now i know this seems to go on a bit but i wanted it to be clear so if you have not done any or only a little sewing before you can do this ... honest x
If you like this tutorial please leave me a comment and let me know and let others now too .. pass it on by all means !!
if you get stuck and need help please just ask me !
I would love to see photo's as well
If you would rather skip the making section you can go to my website
to find some i have made already !!
12 comments:
Most excellent Sara! thank you x x
Am off to make one now! :D
*skips off a happy bunny*
Will post my attempt if it turns out half decent :S
~Buffy x x
Thanks for putting that on - thats so much work - with all the photos.
It takes me all week to do one post - note to self I must Improve - I must Improve ......
Sara
X
Fab tutorial, I think I might even be able to make one of these....
I will have a go tomorrow, but I don't have any felt so wish me luck!
x Alex
Thanks for the tutorial! I think this will be on the list for the weekend. I was considering an apple as the applique, just to be funny.
I MUST learn to sew. I'm missing out.
Jo
Made an attempt, not quite as intended lol
I hope the naming and shaming is Ok with you x x
Any problems with my post please don't hesitate to let me know.
http://buffyscharms.blogspot.com/2009/01/ode-to-sara.html
~Buffy x x x x
that's a great tutorial - thanks.
i may well try that IF my sewing machine will co-operate , it's terrible moody!
This is a great tutoeial - thanks!
Thanks for the tutorial. If I have a go I think I will be too ashamed to let you see it as there is no chance it will look anything like it is meant to look.
Awesome tutorial...you are sweet!
Terrific tutorial!
Love your work - so colourful, and good enough to eat!!
Brillant idea.
Post a Comment